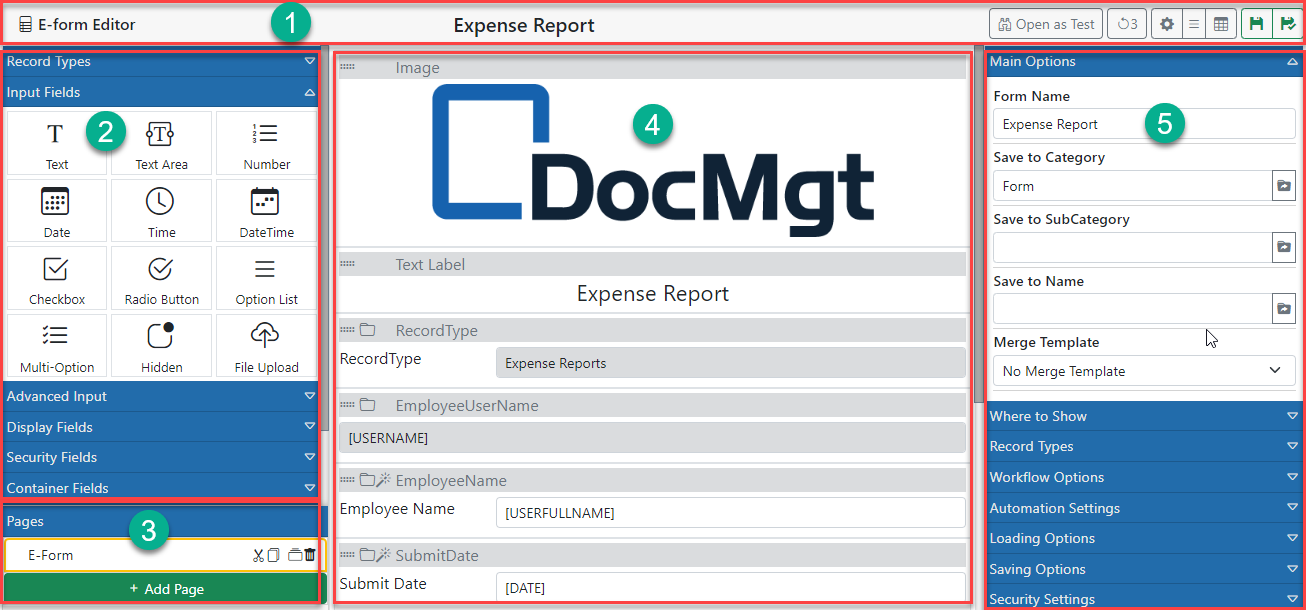
E-form Designer
The Designer is laid out to make form composition as easy as possible.
- On the top is a toolbar that shows basic information and has form options.
- The left panel is the toolbox. This is where you will find the field types that you can use in your forms.
- On the bottom of the left side is the list of Pages in the current form.
- The center panel is the canvas area. This is used for the placement of the form elements - i.e. fields, images, text, etc.
- The right panel is for setting the properties of the selected object. The selected object could be the form itself, the current page or a selected field.
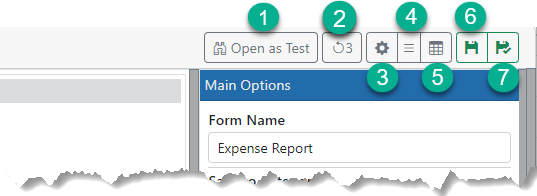
The buttons on the right side of the toolbar are (from left to right)
- Open as Test - Opens the form in another tab for preview and testing
- Undo - You can undo actions using this button
- E-form Properties - Show the properties for the form itself
- Quick Options - This is a drop down of the
- Hide Form controls - Turns on and off the field headers to give you a more realistic view of the form without having to preview it in another tab
- Save E-form without closing
- Save E-form with closing
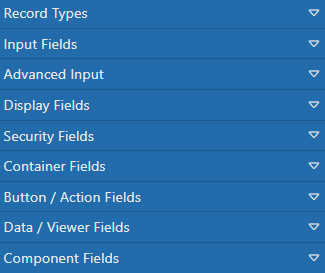
Toolbox:
The available field types show up on the left. You can expand and collapse any section to see the fields that are available in that section and drag and drop them onto the form.
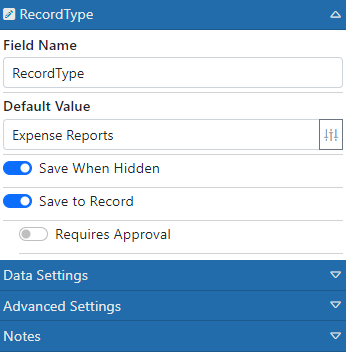
The top section called "Record Types" shows a list of all the defined Record Types in the system. If you expand a Record Type you will see the fields that are defined in that Record Type. You can drag those fields onto your form just like you can the other fields. The benefit of dragging a Record Type field is that the field name is already set properly, the Save to Record setting is turned ON automatically and any options or setting for the defined field are already set on the form. This is a nice shortcut for using fields that are already defined.
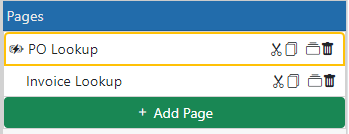
Pages:
On the bottom of the left panel you will see the "Pages" box. Here you can add, edit, delete and re-order pages as needed. Having multiple pages in a form allows for greater flexibility and readability to your forms. A single-page form that is long can be hard to read but breaking that form into multiple pages makes it simpler to navigate.
Canvas:
The center panel is where the form fields are dropped to. Users click and drag from the available fields on the left and drop them onto the middle section. Once the fields are there the user can click and drag to re-arrange the fields and can click on the fields to set their properties. There are a few buttons on the top of each field. The are:
- Copy This Field - Copies the field so you can use the Paste options later to paste a copy of the field elsewhere in the form
- Cut This Field - Copies the field and removed it so you can use the Paste options later to paste the field elsewhere in the form
- Duplicate This Field - Copies the field and immediately pastes it just below the selected field.
- Remove This Field - Removes the field from the canvas.
Properties
The right panel shows one of 3 things - E-form Properties, Page Properties or Field Properties. If a field is selected then the properties panel will show that field's properties. If a page is selected then the properties panel will show that page's properties. If neither a page nor a field is selected then the Form's properties are shown.