SSO Settings
SSO - Single Sign On
Single Sign On (SSO) lets your users log in to DocMgt using an identity they already have — their Microsoft Entra ID (Azure AD) account, their Google account, a SAML identity provider, or, for self-hosted installs, on-premise Active Directory — instead of a separate DocMgt username and password. You configure SSO under Admin, in Main Options, on the SSO - Single Sign On panel. You can enable more than one provider at the same time; users then choose which provider to sign in with.
Supported providers
DocMgt supports four SSO providers, each turned on independently with its own switch: Entra ID (previously known as Azure AD), Google, SAML SSO, and Active Directory. Active Directory SSO is only offered for self-hosted, on-premise installations — it does not appear as an option on DocMgt Cloud, since there is no on-premise domain for the cloud service to bind to. Turning on a provider's switch reveals a settings card for that provider where you enter its connection details; turning it off hides the card and removes that provider as a login option, without discarding the values you had entered.
Entra ID (Azure AD)
Entra ID sign-in requires three values from your Azure app registration: the Tenant ID, the Client ID, and the Client Secret. All three are required — DocMgt will not be able to complete Entra ID sign-in if any of them is missing, and the panel flags each empty field. The client secret in particular is an app registration credential with an expiration date in Azure, so plan to rotate it there before it expires and update it here to match, or Entra ID sign-in will stop working.
Setting up a NEW Azure app registration (see migrating info below)
DocMgt authenticates directly against your own Azure tenant rather than the generic multi-tenant login endpoint, so the app registration in the Azure Portal needs a few specific settings to match:
Authentication
- Supported account types — Single tenant. Choose "Accounts in this organizational directory only." DocMgt always signs in against the specific Tenant ID you enter here, so there is no benefit to a multi-tenant ("AzureADMultipleOrgs") registration — it only adds an inconsistent consent screen.
- Redirect URI — platform Web. Add https://<your-hostname>/signin-oidc, matching your DocMgt URL exactly. If you also want a clean redirect after logout, add https://<your-hostname>/signout-callback-oidc.
- Implicit grant/hybrid flows: leave both Access tokens and ID tokens unchecked.
- Public client flows: Leave this disabled as it is not necessary.
Certificates & secrets
- Client secret. Create one under Certificates & Secrets and paste it into the Client Secret field here. Entra client secrets expire on a schedule you choose when creating them — track that date and rotate the secret (in Azure and here) before it lapses, or sign-in will silently start failing.
Token Configuration (advanced)
- API permissions (Microsoft Graph, delegated). DocMgt requests openid, profile, and offline_access automatically, plus GroupMember.Read.All, which requires admin consent. This permission is only used as a fallback — to look up group display names through Graph when the sign-in token can't carry them directly.
- Token configuration — groups claim. Add a "groups" claim under Token configuration (or set groupMembershipClaims to SecurityGroup or All in the app manifest). Without this, DocMgt receives no group membership information at all, regardless of the Graph permission above. When a user belongs to more than roughly 200 groups, or the claim comes back as GUIDs instead of names, DocMgt automatically calls Graph (using the permission above) to resolve the display names.
Migrating from an existing (V4) Entra SSO setup
If you already have Entra SSO working on an older version of DocMgt, that older setup routed sign-ins through a separate redirect site rather than talking to Entra directly. That site used Entra's implicit sign-in (an ID token returned straight to the redirect site, with no client secret involved). The current version instead talks to Entra directly and requires a client secret. You can run both side by side on the same app registration during the transition, and doing so lets you move users over with almost no work on their end — but there is one setting that must be handled carefully.
The safe approach is to only add to the existing app registration, never remove, until V4 is retired:
- Add the new Redirect URI. Add https://<your-hostname>/signin-oidc (platform Web) alongside the redirect URI the old site already uses. Both can coexist.
- Add a Client Secret. Create a client secret and enter it in the panel here. This does not affect the old setup — the old redirect site has its own configuration with no secret and simply ignores any secret on the registration.
- Leave "ID tokens" enabled until cutover — this is the important one. The general setup instructions above say to leave the ID tokens implicit-grant box unchecked. That is correct for a brand-new registration, but the old redirect site depends on the ID tokens box being checked. If you uncheck it while the old version is still in use, the old sign-in path will break immediately. Leave ID tokens enabled for as long as any user still signs in through the old version.
- After the V5 transition is complete, you can remove the old redirect URI and then uncheck the ID tokens box to return the registration to the clean, current-version configuration.
Because the two paths share nothing except the app registration itself, adding the redirect URI and the secret is safe at any time — the old setup keeps working untouched until you deliberately retire it.
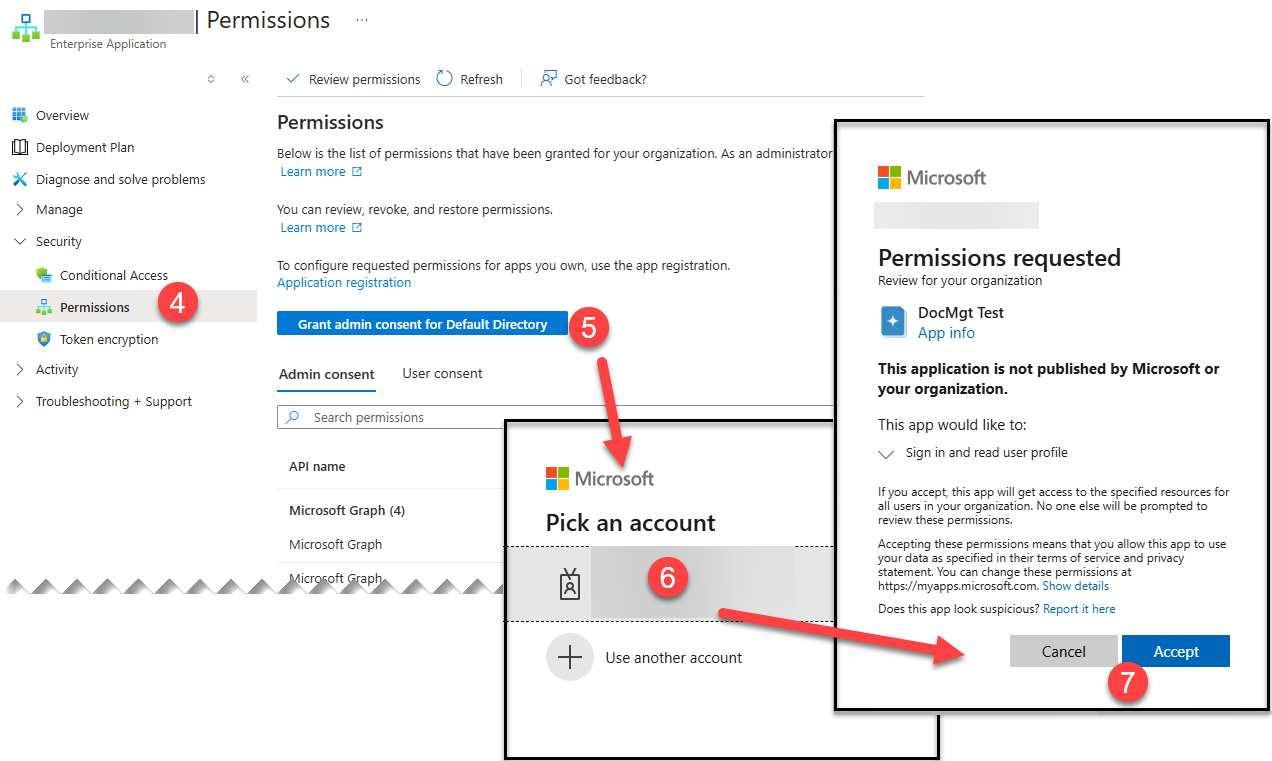
Granting Consent to an Entra ID Application
When linking Entra ID to DocMgt, you will need to have an Entra ID admin grant permission for the link to work. These steps show you how to do that.
- Sign in to the Microsoft Entra admin center as at least a Cloud Application Administrator
- Browse to Entra ID > Enterprise apps > All applications
- Find and open the existing DocMgt application
- Select Permissions under Security
- Click the 'Grant admin consent..." button
- Log in
- Grant Consent by clicking the "Accept" button
Google SSO
Google sign-in requires a Client ID and Client Secret from a Google Cloud OAuth application. Both are required for Google sign-in to work; the panel flags either field if it is left empty.
Setting up a NEW Google Cloud OAuth client (see migrating info below)
- Application type — Web application. In Google Cloud Console, under APIs & Services → Credentials, create an OAuth 2.0 Client ID of type Web application. The resulting Client ID looks like xxxxxxxxxxxx.apps.googleusercontent.com — a string, not a GUID.
- Authorized redirect URI. Add https://<your-hostname>/signin-google, matching your DocMgt URL exactly — this path is hardcoded on the DocMgt side. Also add https://<your-hostname> under Authorized JavaScript origins, as Google's console requires it for a Web application client.
- Client secret. Generate one alongside the Client ID and paste it into the Client Secret field here.
- OAuth consent screen — publish it. Configure the app name and support email, and check the consent screen's Publishing status. While an app is in Testing, only the specific Google accounts you've added as test users can complete sign-in — everyone else is rejected at Google before DocMgt ever sees them. Move the app to In production once you're ready for all your users to sign in (Google's non-sensitive scope review is normally quick, since DocMgt only requests basic profile/email scopes).
- Scopes. DocMgt requests the standard openid, profile, and email scopes automatically — no extra scope configuration is needed on the Google side.
- Group-based sync is not currently available for Google. Unlike Entra ID and Active Directory, DocMgt does not pull Google Workspace group membership during sign-in, so any group-based rights sync you rely on will not apply to users signing in through Google SSO.
Migrating from an existing (V4) Google SSO setup
If you already have Google SSO working on an older version of DocMgt, that older setup routed sign-in through a separate redirect site rather than talking to Google directly. The cleanest way to move to the current version is to create a brand-new OAuth client just for it and leave the old client completely alone. This keeps the two paths fully separate, so there is no way the migration can disturb the sign-in your users are relying on today.
- Create a new OAuth client. In Google Cloud Console, add a new OAuth 2.0 Client ID of type Web application, following the setup steps above. Do not reuse or edit the OAuth client the old version uses.
- Point it at the current version. Set its Authorized redirect URI to https://<your-hostname>/signin-google and add https://<your-hostname> as an Authorized JavaScript origin, then generate a client secret. Enter the new Client ID and Client Secret in the panel here.
- Leave the old client untouched. Because the current version uses its own separate OAuth client, the old redirect site keeps working exactly as before. In particular, do not click Reset Secret on the old client — that would immediately invalidate the secret the old site still depends on and break the old sign-in path.
- Retire the old client after cutover. Once every user signs in through the current version, you can delete the old OAuth client at your convenience.
Creating a separate OAuth client is recommended over reusing the existing one. Unlike Entra ID, a Google OAuth client normally has only a single secret, so sharing one client between the old and new versions means any secret change has to be coordinated across both at once — a separate client avoids that entirely.
SAML SSO
SAML sign-in requires the Idp Entity ID (the identity provider's entity ID) and the Metadata URL (where DocMgt retrieves the identity provider's SAML metadata); both are required. The Sp Entity ID (DocMgt's own service-provider entity ID) is optional — leave it blank to use the default, or set it if your identity provider requires a specific value.
Setting up your SAML identity provider
- Register DocMgt as a service provider. Give your IdP administrator DocMgt's SP metadata URL, https://<your-hostname>/Saml2/Metadata, so they can import it and auto-configure the trust. If your IdP asks for endpoints individually instead, the Assertion Consumer Service (ACS) URL is https://<your-hostname>/Saml2/Acs.
- Sp Entity ID is deployment-wide, not per-tenant. The Sp Entity ID field on this panel is stored per tenant, but the value actually presented to every identity provider is a single value configured once for the whole DocMgt deployment, not per tenant. If your IdP requires you to pre-register a specific SP Entity ID, contact support to confirm the exact value in use — entering something different in this per-tenant field will not change what DocMgt actually sends.
- Idp Entity ID and Metadata URL are what actually drive sign-in. Unlike the Sp Entity ID, these two fields are read per tenant on every sign-in attempt: DocMgt uses the Idp Entity ID to identify which identity provider to use, and fetches the Metadata URL at that time to get your IdP's current signing certificate and endpoints. Get both values from your IdP's own metadata or application configuration page.
- No client secret — trust is certificate-based. There is no Client Secret for SAML. Trust between DocMgt and your IdP is established through the signing certificate published at your Metadata URL, not a shared secret, so there is nothing to rotate here as long as your IdP's metadata endpoint stays reachable and current.
- User identity attributes. DocMgt looks for the user's email under several common attribute names (Email, email, emailaddress, email_address) and falls back to the SAML NameID if none are present; the username comes from the NameID or Name claim, falling back to email if neither is sent. Configure your IdP's attribute statement to include at least an email address (or use an email-formatted NameID) so DocMgt can match the signed-in user to a DocMgt account via the SSO Login User Property setting below.
- Group attribute must use a recognized name. Group-based sync works for SAML, but only if your IdP sends the group attribute under one of these names: http://schemas.microsoft.com/ws/2008/06/identity/claims/groups, http://schemas.xmlsoap.org/claims/Group, groups, memberOf, or group. If your IdP uses a different attribute name for groups, rename it on the IdP side (or ask your IdP admin to add a duplicate attribute under one of these names) — DocMgt does not currently let you remap an arbitrary attribute name to groups.
SSO Options
Once at least one provider is enabled, an SSO Options card appears with settings that apply across every enabled provider.
- Allow Standard Logins — when on, users can still sign in with a regular DocMgt username and password alongside SSO. When off, standard logins are disabled and every user must sign in through an enabled SSO provider.
- Auto SSO Login — when on, DocMgt skips the login page entirely and redirects straight to the SSO provider. Use this once you are confident SSO is working correctly, since it removes the visible fallback to a standard login screen.
- SSO Login User Property — the DocMgt user property that must match the login identity returned by the SSO provider (Entra ID or Google). Choose Username (default), Email Address, or Other Info. Whichever property you choose, make sure the values are unique across your users — if more than one user matches the value returned by the SSO provider, DocMgt logs in as the first matching user it finds, which can put someone into the wrong account.
- Sync Info, Teams & Roles from SSO — when on, each single sign-on or Active Directory login updates the user's First Name, Last Name and Email Address from the identity provider, and sets the user's Teams and Administrator/Reporting roles from the identity provider's group claims (teams are matched by group name; the Administrator role is granted to members of a group named dmAdmin and the Reporting role to dmReporting). Blank values from the identity provider are ignored, so a provider that does not send a name or email will never erase what is already on the user. When off (the default), logging in through SSO only looks the user up — nothing on the user is changed. Leave it off if you manage users and teams using AD Sync, inside Project Title by hand, or if you use SCIM to provision them — turning it on alongside SCIM causes the two to overwrite each other.
Interaction with MFA
Multi-Factor Authentication (MFA), configured in the accordion panel directly below SSO, only applies to standard username/password logins. If any SSO provider is enabled, MFA is not used for users signing in through that provider — the admin panel displays a warning to this effect whenever SSO is on. Treat the SSO provider's own login security (its own MFA, conditional access policies, and so on) as the control that protects those sign-ins.
Role / Team Security Details
When Sync Info, Teams & Roles from SSO is turned on, any user who authenticates via compatible SSO configurations will have their First Name, Last Name and Email Address updated from the identity provider and will be secured as follows. When the setting is off, none of this applies — logging in does not change the user.
- Anyone in the dmAdmin group in AD will be set as an Admin in DocMgt. Even if the user is later set up as an Admin in the DocMgt interface, that setting will be changed the next time the user authenticates.
- Anyone in the dmReporting group in AD will be set as a Reporting User in DocMgt. Even if the user is later set up as a Reporting User in the DocMgt interface, that setting will be changed the next time the user authenticates.
- The Security Groups that the user is in will be used to set them up in DocMgt Teams. The logic is as follows:
- For each SSO Group for that user see if there is a matching DocMgt Team.
- If no match then skip
- If match then see if the user is in the Team
- If yes then move on
- If not then add the user to that Team
- For each DocMgt Team for that user see if there is a matching SSO Group.
- If no match then skip
- If match then see if the user is in the SSO Group
- If yes then move on
- If not then add then remove that user from that Team
TIPS
- Before enabling any SSO provider, confirm your admin users are members of the proper SSO group(s) or account(s) first — enabling SSO without this can lock administrators out of the system.
- Fill in every required field for a provider (marked on the panel) — Entra ID and Google sign-in fail outright if any required value is missing.
- Pick an SSO Login User Property whose values are guaranteed unique per user; a collision causes DocMgt to silently log in as the wrong account.
- Turn on Auto SSO Login only after you have verified sign-in works, since it removes the standard login page as a visible fallback.
- Remember Active Directory SSO is on-premise only — it is not available on DocMgt Cloud.
- Remember MFA does not protect SSO logins — security for those logins depends on the SSO provider's own configuration.
- If you turn on the Auto SSO Login option then non SSO users will never have a chance to log in manually through the normal URL. However, they can use a different URL to get to the login screen so they can select the Show Standard Login button. The manual login URL is https://<your-hostname>/manual.
NOTE: Be sure no more than one user will match the SSO login name selected in SSO Login User Property. If more than one user matches, DocMgt automatically logs in as the first matching user found, which can grant the wrong person access to that account.