Viewing
The record screen is one of the main screens in the system. It is the screen in which you will likely spend most of your time.
Below is an example of the Record Screen. The screen displays several data points along with documents. It also has several actions you can take depending on your rights and any custom buttons that have been configured.
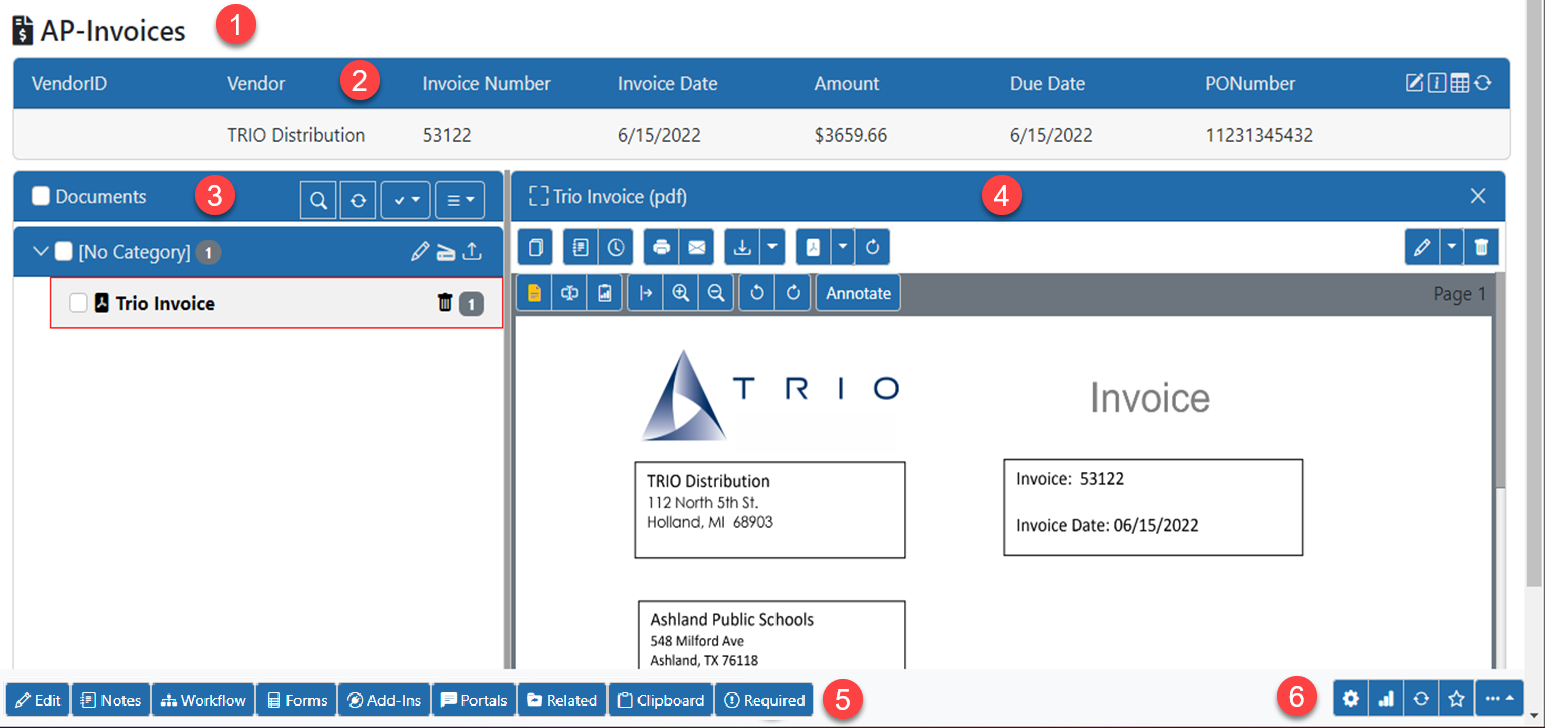
- Record Type Heading – This tells you what type of data the selected record represents. For example, the selected record is “AP Invoices”. This can be customized via the Record Type Admin area if needed.
- Record Data – The data that represents this record is shown in the top bar. The default view is to show you a single line with the first 7 or 8 fields defined. You can also use the "table" icon in the section header to change to a grid view much like in V3.
- Document List – The list of documents that are in this Record. They are generally broken down by Category and sometimes SubCategory.
- Document View – When you select a document in section 3, the document shows in section 4. This section has options for printing, emailing and more.
- Left Footer – The left footer area has extra data and more options for the current Record
- Edit – This is where you can edit the invoice if the data wasn’t already pulled or if there was a mistake in the scan
- If you do not have EDIT rights then this button shows DATA instead where you can see all the data for the Record
- Notes – This is where you can add notes about this Record.
- Each note is shown along with the user's name who made the note and the date and time they made it.
- Notes are Write Once, Read Many. In other words you can add notes but you cannot delete or edit them.
- Workflow – Selecting this opens the workflow panel. Here you can see if there are any workflow options available for the Record.
- If you are an ADMIN you can also send the Record down workflow from this panel
- If your system does not have Workflow licensed, this button will not be shown
- Forms – In the forms button, you are able to see any E-forms that are available for you to create inside this Record.
- If your system does not have E-forms licensed, this button will not be shown
- Add-Ins – Add-Ins are custom buttons that are created to perform tasks. They are similar to workflow but without needing a workflow process.
- Portals – Portals allows you to view and manage the Collaboration Portals that have been configured for this Record.
- Related – Related pulls up any Records that are related to the current Record. For instance, an Invoice might have a PO that it is related to. This panel will show you those related Records.
- Clipboard - Clipboard allows you to to move or copy Documents between Records
- Required – This opens a panel that shows a list of all the Documents that are Required for the Record. If they have been completed they will show up in the bottom of the panel. If they are not completed they will show on the top section. You can use this panel to Upload or Scan documents easily into the proper location of the Record.
- Right Footer – The right footer area has options to edit settings for the documents, view data received or sent out from the specific document, refresh the document and more.
- Open RecordType Admin – (ADMIN USERS ONLY) This button brings up the Record Type Admin for the Record Type the current Record is in.
- Reports - This button brings up the Reporting panel. Reports include":
- View Logs
- Change Logs
- OCR
- SMS Messages
- Email Messages
- Work Items
- Work Item History
- Portals
- Refresh data – Reloads the Record screen including all data and documents
- Favorites – With this button, you can set this Record as a Favorite or not a Favorite as a toggle. Favorites show in the toolbar under the Favorites button for easy access.
- Other Actions – This will pull up other options you can perform
- Classify Pages
- Split Documents into Separate Records
- Merge with Other Record
- Download All Record Data
- Export Entire Record
- Delete Record
- Purge Record (ADMIN ONLY)
- Open Record in V3