Fields
Fields are used to define the types of data that will be stored in these records. You supply a Name and Type at a minimum.
BE CAREFUL: There are a few field names that are reserved for special purposes so should not be used in your definition. The reserved names are:
- RecordID
- SearchString
- Unindexed
- Anything that starts with __ (2 underscore characters)
Other field names that can cause headaches later are those that match the built-in variables. See the Variable Replacement section and try not to use those names.
Fields are also how the system determines what Record Type any given record is associated with. By looking at the fields of a Record and the values contained within the fields, the system can tell what the record type is and can apply the proper Entry and Search screens. This is done by using the Filter Values for the fields **. See a full explanation below.
Basic Options
Field Label - The field name that the end users see in all screens. This is a descriptive field name.
Field Name - The actual name of the field as the system sees it (the name used to import the record might be "EmpNum" but you would use a header or "Employee #" to make it more readable to users).
Field Type - The type of information to be stored in this field (Hidden, Text, Numeric, Date, Option List, Multi Option List, Cascading Options, User List, AutoID, Record Type Link, SSN Mask). This is used to build the correct entry/search screen types as well as to define how searches work against this field.
Drop Down Options (1) - This is only visible when the field type is set to Option List or Multi Option. This is the list of options to show - one per line.
Inline - This is only visible when the field type is set to Multi Option. This sets whether to show the check boxes all in one line (Inline) or one per line.
Link To Field - This is only visible when the field type is set to Cascading Option. This allows you to select which other field this field will be dependent upon to determine which options to show.
Linked To - This is only visible when the field type is set to Record Type Link. This allows you to link a field from one record type to values in another record type. Select the Record Type to link to in this field.
Drop Down Options (2) - This is only visible when the field type is set to Cascading Option. This section is where you configure the options to show in this drop down based on the value selected in the linked field.
Value Field - This is only visible when the field type is set to Record Type Link. Set this to the field in the "Linked To" record type that holds the Value that is supposed to be stored in this record type.
Display Field - This is only visible when the field type is set to Record Type Link. Set this to the field in the "Linked To" record type that holds the Display Value that is supposed to be shown when looking at a record in this record type.
Search Display - This is only visible when the field type is set to Record Type Link. Typically the Value field is displayed in search results to keep the search faster. If you wish to show the Display value then turn this on. This will slow down your searches unless the Display and Value fields are the same.
Other Linked Fields - This is only visible when the field type is set to Record Type Link. In addition to being able to pull this field's value from another Record, you can also pull other fields from that same record at the same time. Add the fields to pull from and also specify which field in the current record to put those value into.
Default Value - When entering new records you can default a value for the users to save them time
Read Only - Whether or not to allow the end users to enter any data into the field. You can default a value and set it read only so the users can see the value but not change it. You can achieve a similar effect by using a hidden field except the users wouldn't able to see the value during entry or view.
Compute Value - Whether or not to re-compute the field's value every time it loads. This is really only useful if there are variables in the Default Value. If there are then you can have the system evaluate those variables on every load. However, fields that have this setting ON are not very good for searching because there is no guarantee the value in the database matches what the value will be the next time it is loaded.
Advanced Options
Allow Adding - This is only visible when the field type is set to Record Type Link and the link has no link limits set. Turn this ON to allow end users to add new entries into the linked project while they are performing standard data entry.
Link Limits - This is only visible when the field type is set to Record Type Link. You can use this to limit the records from the "Linked To" record type that are provided for indexing. For instance, in this example the users will only see the Vendors that have been Approved. You can use variables with [ and ] in the VALUE so your limit can use values currently available in the fields to limit other fields. You can also use variables with { and } in the VALUE to be parsed on the server.
Formatting - Specify the custom formatting to use for Numeric and Date fields. This uses standard Microsoft formatting syntax.
Numbers: https://docs.microsoft.com/en-us/dotnet/standard/base-types/standard-numeric-format-strings
Dates: https://docs.microsoft.com/en-us/dotnet/standard/base-types/standard-date-and-time-format-strings
Special formatting trick: If you have a Numeric field and you use a percentage format syntax (i.e. starts with P) then the search results screen will show a percentage graphic along with the number.
Show Field - The places where this field will show up. You can use the field for Entry, Search or both or only for applying a filter. If you specify Search then the field will be shown to users on the Search screen but not in the Entry screen. Using Entry does the opposite.
Requirement Level - Set this to one of the 3 requirement levels available. Not Required is used when this field is optional. Required is used when this field must be entered. Verify If Empty is used when the field should usually be required but not always. Requirement Level is only valid for manual entry.
Match and Merge - All fields with this option ON will be used to find matching Records in which to file newly saved Records. Any new Record saved into the system will be checked against existing Records and if a match is found then no new Record is created. Instead, the values send in with the new Record are used to update the existing matched Record. If no fields are marked ON then Match and Merge will not happen. BE SURE the RecordTpe field is also set for Match and Merge to ensure only Records of this type are matched against.
Match and Merge Rules: If an incoming field is blank then the original value is not overwritten. If the incoming field is the value # then the original value is blanked out. If the incoming value is any other value, then the original value is overwritten with the new value.
Unique Checking - All fields with this option ON will be used to verify any new Record saved is unique. Any new Record saved into the system will be checked against existing Records and if a match is found then an exception is thrown and the Record is not allowed to save. If no fields are marked ON then Unique Checking will not happen. BE SURE the RecordTpe field is also set for Unique Checking to ensure only Records of this type are matched against.
'Starts With' Search - If checked ON this will treat any text being searched for as a "starts with" search by adding a wildcard (%) at the end of the search value. You can negate this affect by appending a tilde (~) at the end of the search string to revert it back to an equals search.
'Ends With' Search - If checked ON this will treat any text being searched for as an "ends with" search by adding a wildcard (%) at the beginning of the search value. This is NOT recommended as this makes searching much slower. However, there are times when it is required. Use this option with care and never on large data sets!
Filter on Field - Whether or not to filter the records based on this field. **
Filter Value - The value that needs to be in this field for the system to associate the Record with this Record Type. If Date or Numeric values are used in both the Filter Value and Filter Value To then the Record value must be >= (greater than or equal to) this value to match. **
Filter Value To - Only used for Date or Numeric values. The Record value must be <= (less than or equal to) this value to match. **
Remember - Whether or not remember the last added value for this field. The value is saved for only the current user and only on the current computer. This allows each user to have their own last value. This is very useful for situations where repetitive data is being entered. This is saved in a cookie on the user's workstation so be careful that you don't use this for sensitive data because cookies are not secure.
Multiple - Whether or not to allow multiple values for this field. This is useful for situations like tracking Invoices that a check has paid.
Variables - Whether or not to replace variables as the record is saved. The default is to replace variables as the entry screen is loaded but if you intend on using the entered values in the replacement you can turn this ON to defer replacement until after entry.
Display Options
This tab is used to change the background and text colors of the fields. These colors take affect when the record is viewed in the Search Results as well as in the Viewer screen.
Value - The value this field needs to equal to use the defined colors. Also used for the FROM value in range matching for Numbers and Dates. You can also use REGEX strings here as long as the TO field is empty. If the value matches the REGEX then it will count as a match and the colors will be applied.
Value To - The TO value in range matching for Numbers and Dates.
BG Color - The background color to use when this field matches the defined value(s)
Text Color - The text color to use when this field matches the defined value(s)
* Note that if more than one match is found then the first match that is made is used. Arrange the entries with that in mind.
Auto-Index Options
This tab is used to define automatic indexing options for field. NOTE: If you have Enterprise Edition it is much better to use the workflow actions for auto-indexing.
Matching - Select the matching method to be used to automatically index this field.
Parsing - Only visible for File Name Indexing and REGEX. You can use the full file name, split the file name on a character or use REGEX.
Split On - Only visible for Split Value parsing. Select the string to split the file name on. Each element of the split string is then available for use for the field value.
Array Index - Only visible for Split Value parsing. Specify the split number to use from the file name. This value is 0-based so the first split is element 0.
Grouping Pattern - Only visible for REGEX parsing. Specify the REGEX pattern to use for splitting the incoming values.
Match Number - Only visible for REGEX parsing. Specify the REGEX match number to use from the file name. This value is 0-based so the first match is 0.
Full Text Source - Only visible for Full Text Indexing. Specify whether to use OCR or Barcodes for the data. The OCR and Barcodes are read from the document being processed.
Page Number - Only visible for Full Text Indexing. Specify the page number on which the OCR or Barcode data is coming from. Use 0 for all pages.
Source Regions - Only visible for Full Text Indexing. Specify the areas of the page where the value resides.
Custom Regions - Only visible for Full Text Indexing. Specify a custom area of the page where the value resides.
Field Name - Only visible for PDF Form Indexing. Specify the name of the form field in the PDF that holds the value for this field. You can leave this blank if the PDF form field name is the same as the record type field name.
Public Options
This tab allows you to alter the way this field interacts with the public access portal. This tab will only show if the Public Portal option is turned on for the Record Type.
Searchable Field - Whether or not this field should be shown on the Public Access search form
Display Field - Whether or not this field should be shown in the Public Access search results.
Public Name - The name to give this field in the Public Access screens. If you leave this blank the the Field Name will be used.
NOTE: The public portal currently only supports Text, Number, Date, and Option fields. Any other field shown will be displayed as a TEXT field.
**Numeric Field Formatting
Numeric fields have one extra option call "Formatting" that allows the numeric data to be formatted in a specific way. This is useful for phone numbers, Zip codes, Social Security Numbers, etc. If you apply a format then the data is stored in simple numeric form but is displayed in the formatted form. For instance, if you have a phone number field defined as numeric and you use (000) 000-0000 for the format then the data will look like (555) 123-1234 but will be stored in the database as 5551231234. This makes searching and sorting easy yet still allows for proper formatting of the values.
You can use 0 (zero) or # (pound sign) in the formatting field. A zero will place a 0 at that location of the string if there is no other number. So a format of 00-000 will format the number of 1234 to 01-234. A pound sign will place no digit at that location of the string if there is no other number. So a format of ##-### will format the number of 1234 to 1-234.
** Important Note about Filters
Filters are VERY important to the proper operation of the system. When you enter a value into the "Filter Value" or "Filter Value To" field you are telling the system that any Record that has data matching the filter(s) belongs to this Record Type. A Record must match ALL filters in a Record Type for this match to be valid.
For example, in the screen shots above we are defining a Record Type of "Vendor." We have 2 fields that have filters - "RecordType" = "Vendor" and "Vendor ID" = "*". For a Record to be considered a Vendor record it must have a field named "RecordType" with the value "Vendor" and it must have another field named "Vendor ID" with ANY value in it.
Points:
- Matches are NOT case sensitive so "Vendor" is the same as "VENDOR" is the same as "vendor"
- The "*" value means the Record must have that field but it doesn't matter what the value is
- To match on an empty or non-existent value you can use "[EMPTY]" as the "Filter Value." If the Record has the field and it is empty or if the Record does not have the field then this is considered a match.
- Date and Numeric values use range checks as long as both the "Filter Value" and "Filter Value To" values are defined. If only the "Filter Value" is defined then the match uses an = (equal to) match.
- ALL Filter Values for the Record Type must match for the Record to be considered a match
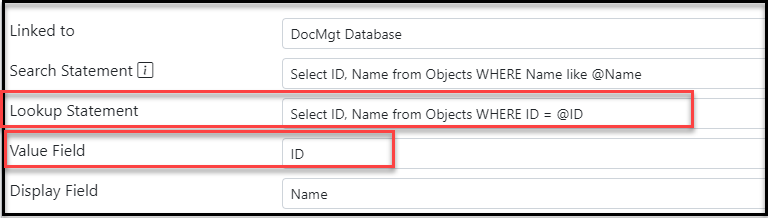
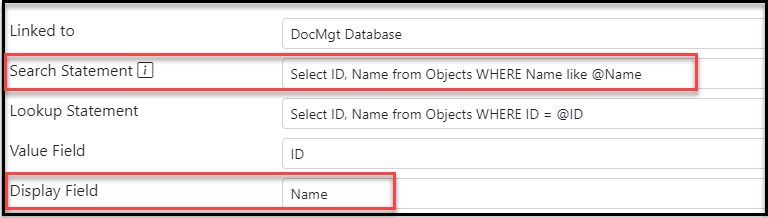
** RecordType Link Fields Using Connections
When using a RecordType Link field with Connections, the Value Field is used as a parameter for the Lookup Statement. The DIsplay Field is used as a parameter in the Search Statement. For SQL Connections, you would use the field name as a parameter in your SQL statement.
For the Search Statement, if you have a table named "Objects" where you use the "Name" column to search, you would put "Name" as your Display field and would set up your SQL Serch Statement value like this:
Select ID, Name from Objects where Name like @Name
For the Lookup Statement, if you have a table named "Objects" where you use the "ID" column as your actual data value, you would put "ID" as your Value field and would set up your SQL Serch Statement value like this:
Select ID, Name from Objects where ID like @ID