Add-Ins
Add-Ins are used to extend the base functionality of Add-Ins. You can add buttons at strategic locations in the interface that allow your users to open other web pages or even perform full program actions.
Add-Ins can be as simple as a web page link to take the user to another application or as complex as a DLL written specifically to perform a business function.
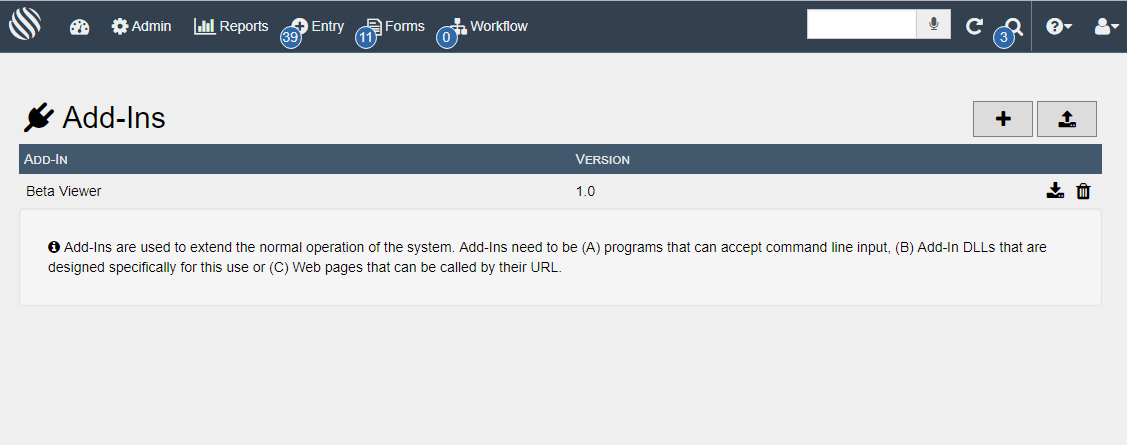
To add a new Add-In, click the ADD button  to bring up the Add/Edit screen.
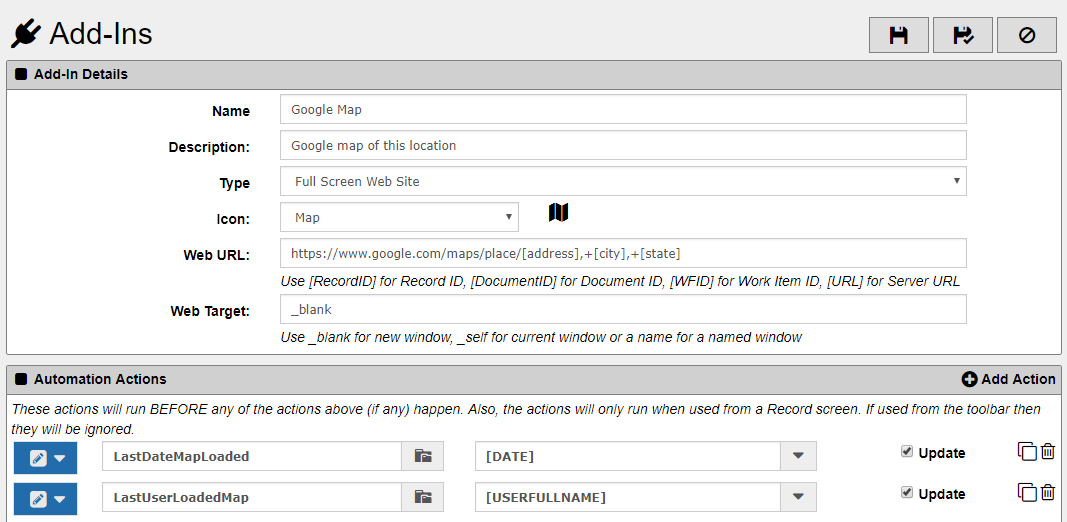
Add-In Details
Name - The name that will be shown on all the Add-In buttons for this Add-In.
Description - This is only shown here for your notes
Type - This is where you specify the type of Add-In you wish to use. The other questions that appear will depend on the option you select here.
Version - Use the version field if you need or want to keep track of which version of the Add-In is installed.
Icon - Select an icon that most closely relates to your Add-Ins function.
App to Start - If you specified Windows Application or Windows Add-In then this this is where you would enter the name of the application or DLL to run. This application must be included in the ZIP file that is uploaded (see below).
Parameters - If you specified Windows Application then this this is where you would enter any parameters you need to send into the application. You can use variables like [RecordID], [DocumentID], etc.
ZIP File - You must upload a ZIP file that contains the entire application that you wish to run. This includes any DLLs that are required. When launching a windows application or DLL Add-In there is a self-installed helper application that downloads and executes your Add-In on the local machine. The ZIP file is downloaded automatically and extracted for use by your Add-In.
Web URL - If you specified any URL-based types this this is where you can put the URL value. You can use variables like [RecordID], [DocumentID], etc. to be able to send those IDs to the URL you are calling.
Web Target - The name of the window to use for showing the URL.
Automation Actions
Automation actions allow your Add-In to perform certain actions from the server side before triggering any other interface. For instance, your you might have the add-in update a REcord variable before calling your custom add-in screen. You could also add notes and trigger workflow from your add-in button click.
These actions are very similar to Workflow Actions but are not dependent on having Workflow enabled.
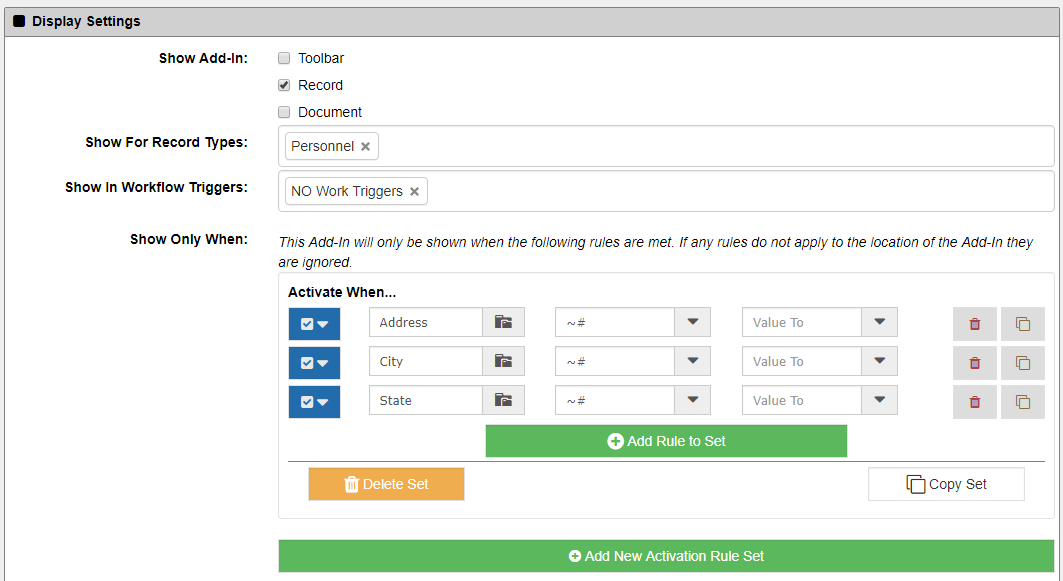
Display Settings
Show Add-In - Where to show the button(s) for this Add-In inside the docMgt interface.
Toolbar - This will show the button(s) on the toolbar. If only Add-In is set to display here then that will be the button that shows. If more than one are to display then a drop-down menu of available Add-Ins is shown.
Record - This will show the button(s) on the Record screen in the Information panel. If only Add-In is set to display here then that will be the button that shows. If more than one are to display then a drop-down menu of available Add-Ins is shown.
Document - This will show the button(s) on the Record screen in the Documents panel. If only Add-In is set to display here then that will be the button that shows. If more than one are to display then a drop-down menu of available Add-Ins is shown.
Show For Record Types - If you selected Record or Document above then you can specify the Record Types for which this Add-In is valid. If the user is in a Record for that Record type then this Add-In will be available.
Show For Workflow Triggers - If you selected Record or Document above then you can specify the Workflow Triggers for which this Add-In is valid. If the user is in a Record and that Record is shown in the context or a Workflow Trigger and that Trigger is one you selected then this Add-In will be available.
Show Only When
After the above options are evaluated and the Add-In passes those tests, you can also add in more visibility tests to give you greater control over when the Add-In is seen. For instance, you can specify to show the Add-In only when the current Record has a field named "City" that is not blank. Or you could have this Add-In only show when the "Age" field is greater than 50.
These activation rules are very similar to Workflow Activation Rules but are not dependent on having Workflow enabled.