Containers/Tables
The Containers section contains fields that can contain other fields.
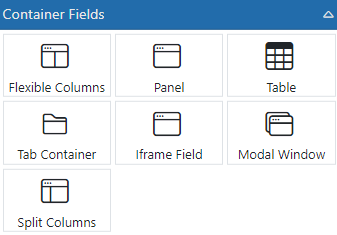
Flexible Columns - This is a column container based on a flexible grid design. The rows of this container field are set to a specific grid of 3x3x3x3 or 4x4x4 or 3x9, etc. The total number of cells is 12 so all options for the grid add up to 12. Set the grid pattern then drop fields into the container to align them.
Panel - The Panel is a unique container which has a Heading and a Footer and a Body that contains other fields. The panel can be made to stand out from the form using colors. It can also be made to expand and collapse.
Table - Creates a table that can be configured for any use.
Tab Container - Gives multiple tabs for users to open. Each tab has its own fields defined within it.
iFrame - Allows you to embed other web pages into it as long as the other web page is configured to allow your E-form to show it.
Modal Window - A pop up window that can hold fields. It can be opened using a button, toolbar or multi-action field by using the Open/Close Modal Window option.
Split Columns - This is a 2-column container that is manually sizable using a splitter bar. The size is set by a percentage of total container width so it will size up and down as the screen size changes.
Special Table Considerations
For the following examples, we will be referring to a table named "People" that is defined as having 5 rows with 4 columns named "Name", "Address", "City" and "DOB".
"People" table
|
NAME |
ADDRESS |
CITY |
DOB |
|
John Smith |
123 Any Street |
Anytown |
3/1/1966 |
|
Amy Weisman |
987 Through Street |
Nowhere |
5/30/2001 |
|
Jennifer Swift |
888 Prairie Circle |
Borough |
8/3/1995 |
|
Patty Cake |
456 Fourth Street |
Blahblah |
7/25/1980 |
|
Jack Inthebox |
369 Skipping Ct |
Popper Plains |
6/15/2014 |
Reading Table Information
Reading data from tables on the client side requires special syntax. Here are some examples on how to get data from table rows, columns and cells.
Reading values uses the {TableName|RowNum|ColumnName} syntax.
Here are some examples:
Reading a value by Row # and column name
If you need to get the DOB value from the 3rd entry in the table - use {People|3|DOB} to get 8/3/1995
Reading an entire row
If you need to get the entire 3rd row - use {People|3} to get Jennifer Swift^888 Prairie Circle^Borough^8/3/1995
* Notice how the values are separated by a caret (^)
Reading an entire column
If you need to get the entire 3rd column - use {People| |3} to get Anytown^Nowhere^Borough^Blahblah^Popper Plains
* Notice how the values are separated by a caret (^). Also, to be sure the system returns the proper data, it is best to use a space for the row # and not have the two || next to each other.* Notice how the values are separated by a caret (^)
Reading a column footer value
If you want to get the footer value of a column (SUM, etc.) then you have 2 options.
- You can use F or FOOTER as the row number like this: {People|F|DOB}
- You can use the {Table:Column} syntax lkie this: {People:DOB}
Reading the number of rows in a table
If you want to get the number of rows in a table, you can use the {Table|Count} syntax: {People|Count}. You can also use "rowcount": {People|RowCount}
Writing Table Information
Adding and updating data in tables on the client side is done through button clicks or using the Multi-Value Update field actions. To update the table, you must tell the system which row(s) and column(s) to update.
Writing values uses the RowNum|ColumnName|Value syntax. You don't specify a Table because the buttons and update fields allow you to specify that. Here you just need to specify which rows/columns and the values.
RowNum has some special codes you can use as well.
- 1 and up = The row number to update. Rows will be added as necessary if the row specified does not exist
- 0 = Row 0 (zero) tells the system to add a new line
- L = Row L (letter L) tells the system to update the LAST row in the table
- # = Row # (pound/hash sign) tells the system to update ALL lines
- clear = Clear the entire table. If you use this command, do not add the column or value elements.
Here are some examples:
Updating a value by Row # and column name
If you need to update the DOB value in the 3rd entry in the table - use 3|DOB|8/3/1995. If the table does not have a row 3 - rows will be added to get to the third row.
If you need to update the DOB value in the all rows - use #|DOB|8/3/1995.
Updating an entire row
If you need to update the entire 3rd row - use 3||Jennifer Swift^888 Prairie Circle^Borough^8/3/1995. If the table does not have a row 3 - rows will be added to get to the third row.
* Notice how the values are separated by a caret (^) and each portion of that string is assigned to the column that has the same position.
Updating an entire column
If you need to update the entire 3rd column - use #|City|Anytown^Nowhere^Borough^Blahblah^Popper Plains
If you need to update the entire 3rd column starting with the last row and adding form there - use L|City|Anytown^Nowhere^Borough^Blahblah^Popper Plains
If you need to update the entire 3rd column starting with a new row and adding form there - use 0|City|Anytown^Nowhere^Borough^Blahblah^Popper Plains
* Notice how the values are separated by a caret (^)
Adding Multiple Rows
If you need to add multiple rows, you can separate each row command with a tilde character - ~
For instance, to add 2 rows to the table you can use 0||Jennifer Swift^888 Prairie Circle^Borough^8/3/1995~0||Adam Sandstorm^100 Maple Rd^Thistown^5/25/2000
To clear a table and add 2 new rows to the table you can use clear|0||Jennifer Swift^888 Prairie Circle^Borough^8/3/1995~0||Adam Sandstorm^100 Maple Rd^Thistown^5/25/2000
Sending Commands to Tables
You can use a variation of the writing technique above to send commands to tables.
Sorting Tables
If you want to sort a table you can use an action field such as a button, multi-action, timer, etc. Select "Sort Table by Column" in the Action Type. Then select the table to sort. Then enter the name of the column to sort by and select a direction - Toggle, Ascending or Descending. Any time this action runs it will re-sort the table. If rows are added or changed, the table may be out of sort so you may need to perform the sort after data entry. The common way to use this is on E-form load via a timer so the data starts out sorted. If you need the data also saved sorted after edits, then you can also sort before the E-form is saved by using a custom button in place of the normal save button. Have that button call a Multi-Action field that sorts the table then calls the E-form save method.
Buttons in Tables
You can have table columns set as buttons to perform actions. The click of the button can set field values, call action sets, etc. When you are setting values, you can use [ ] tags to denote values form the current row. For instance, if you design a button to set a text field to the value of the CITY column of the current row, you could use [CITY] as the value to set. You can also return the row number of the button that was clicked by using [#] in the value.
If you use the button in conjunction with the table writing method above, you can have a button that sets the current row's ADDRESS to a value from another field. Set the table's value to [#]|CITY|{FieldToUse} and that will take the value in the "FieldToUse" field and put it into the current row's CITY column.
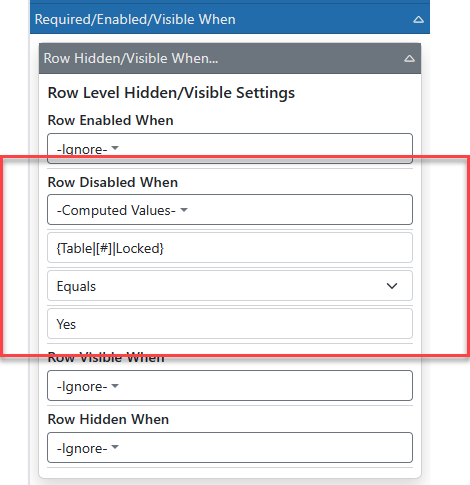
Rows in Tables - Setting Enabled, Disabled, Hidden, and Visible
Table rows can be hidden, disabled, etc. just like fields. You use the "Row Hidden/Visible When" panel the same as you do with a field. The exception is when you want to hide/show based on a value in the current row itself then there is a special way to do that.
You will need to use the {TableName|RowNum|ColumnName} syntax as described above with one exception. The RowNum value should be set to [#] to get the current row number. For example, if you want to disable any rows where the "Locked" column is set to "Yes" you would use the "Computed Values" selection with {Table|[#]|Locked} as the value, select "Equals" and then "Yes".